

 |
| All the pieces needed for the tower. |
 |
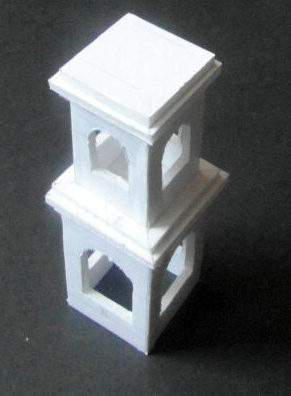
| Top two tower sections assembled. |
The photograph below shows the assembled sections.
 |
| Showing how they fit together. |
 At the same as I was assembling the tower, I also cut out the base for the church fromtwo pieces of foamboard glued together to give a 1cm thick base. I used a large piece of MDF as a weight to prevent the inevitable warping that would have occurred. Two features of this base are the front two steps (on the right of the base as shown) and the two smaller bits that stick out of the top edge and the bottom edge, which will be small entrances to the back of the church - as per the original model).
 |
| The tower's four lower walls |
This did mean a little extra work but was worth the effort to get the tower looking the 'right' height above the church roof.
On the photograph you can just about see the rabbets cut into the sides and bottom of the pieces and the extra length of the two walls that will sit at the edge of base.
I also cut a doorway into the tower and as this will be the wall abutting onto the church then a corresponding portal would also have to be cut into the wall of the church.
 It should be obvious that if I have an internal doorway then I will be making the whole building with a mind to having access for figures too. Whether or not the tower will have a door or merely a doorway I'm as yet undecided and as the lowest level of the tower will be amost impossible to have access for figures I'll probably go with having sealed access, in other words, I'll be making a door!
Having made the lower tower wall flush with the base I also realised I would have to do someting similar with one of the long walls of the church too, which once again meant cutting another wall, rather than cut-down one of the existing ones.
Thankfully this wasn't as arduous a task as I'd thought it would be and didn't take long. I also used the opportunity too cut the portal in the wall that would correspond to the tower doorway.
 |
| Spot the boring area |
The photograph shows the decoration (two strips of thin card) added to the top part and couple of strips of foamboard to sepaerate top and bottom halves.
The entrance pilasters were turnerd into columns by adding foamboard columns topped off with bits of ticker card.
I did tinker with the idea of having the main doors to the church openable but I'm not convinced of the usefulness of such a feature, despite the obvious attraction of having it.
I may still add a window, or something simlar, to the main front facade, as there's an obvious large plain boring area that needs "something".
 |
| Interal view of rear wall. |
I cut the hole for the window slightly smaller than was needed and carefully filed it until the plastic window had a firm fit and then it was glued in place.
The final bit of modelling I managed this week was the inside wall to the front face, this piece I felt was necessary to enable the roof to sit easily onto the model (the rear wall would be used as is).
Of course this necessitated another doorway into the main body of the church being cut and matched to the aleardy cut front two pieces.
 |
| Internal front wall (rabbets can just about be seen) |
I still have the perimeter walls to cut and fit, two entrances to model and the whole thing to assemble, which once done will be covered in filler to hide all the mistakes! I've a small building to add to the rear of the main one, doors to make and the list goes on and on, before I can even think about painting!
So that's it then for this week, thanks for taking the time to visit and as always your comments, good bad or indifferent are always welcomed and appreciated.


0 Yorumlar